引言
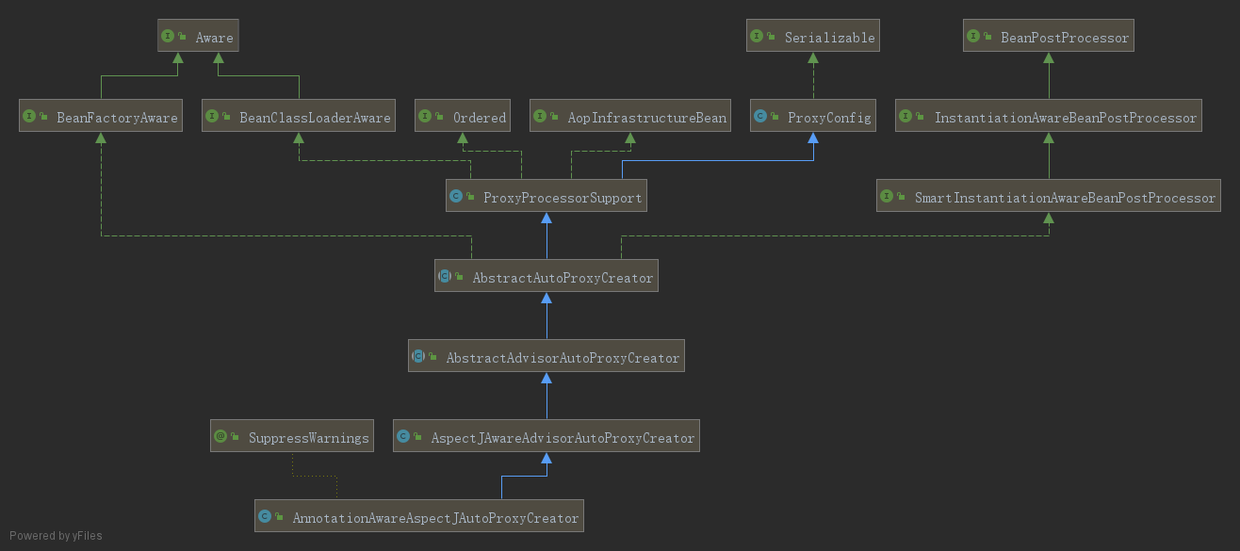
通过上一篇文章的分析,我们知道AOP的具体实现在AnnotationAwareAspectJAutoProxyCreator类中。
贴上它的类继承关系图:

源码分析入口在其父类AbstractAutoProxyCreator的postProcessAfterInitialization(@Nullable Object bean, String beanName)方法中:
1
2
3
4
5
6
7
8
9
10
11
12
13
14
|
@Override
public Object postProcessAfterInitialization(@Nullable Object bean, String beanName) {
if (bean != null) {
Object cacheKey = getCacheKey(bean.getClass(), beanName);
if (this.earlyProxyReferences.remove(cacheKey) != bean) {
return wrapIfNecessary(bean, beanName, cacheKey);
}
}
return bean;
}
|
进入wrapIfNecessary方法:
1
2
3
4
5
6
7
8
9
10
11
12
13
14
15
16
17
18
19
20
21
22
23
24
25
26
27
28
29
30
31
32
33
34
35
36
37
38
|
protected Object wrapIfNecessary(Object bean, String beanName, Object cacheKey) {
if (StringUtils.hasLength(beanName) && this.targetSourcedBeans.contains(beanName)) {
return bean;
}
if (Boolean.FALSE.equals(this.advisedBeans.get(cacheKey))) {
return bean;
}
if (isInfrastructureClass(bean.getClass()) || shouldSkip(bean.getClass(), beanName)) {
this.advisedBeans.put(cacheKey, Boolean.FALSE);
return bean;
}
Object[] specificInterceptors = getAdvicesAndAdvisorsForBean(bean.getClass(), beanName, null);
if (specificInterceptors != DO_NOT_PROXY) {
this.advisedBeans.put(cacheKey, Boolean.TRUE);
Object proxy = createProxy(
bean.getClass(), beanName, specificInterceptors, new SingletonTargetSource(bean));
this.proxyTypes.put(cacheKey, proxy.getClass());
return proxy;
}
this.advisedBeans.put(cacheKey, Boolean.FALSE);
return bean;
}
|
注释已经写的比较清楚了,主要有两大步骤:
- 获取指定bean的增强方法
- 创建代理对象
1、getAdvicesAndAdvisorsForBean(bean.getClass(), beanName, null)
获取指定bean的增强方法:
1
2
3
4
5
6
7
8
9
10
11
12
13
14
15
16
17
18
|
@Nullable
protected abstract Object[] getAdvicesAndAdvisorsForBean(Class<?> beanClass, String beanName,
@Nullable TargetSource customTargetSource) throws BeansException;
|
最终由子类实现,这里为AbstractAdvisorAutoProxyCreator,这里的细节后期分析,本篇先把主要流程走完。
下面看创建代理对象。
2、createProxy(bean.getClass(), beanName, specificInterceptors, new SingletonTargetSource(bean))
创建代理对象:
1
2
3
4
5
6
7
8
9
10
11
12
13
14
15
16
17
18
19
20
21
22
23
24
25
26
27
28
29
30
31
32
33
34
35
36
37
38
39
40
41
42
43
44
45
46
47
|
protected Object createProxy(Class<?> beanClass, @Nullable String beanName,
@Nullable Object[] specificInterceptors, TargetSource targetSource) {
if (this.beanFactory instanceof ConfigurableListableBeanFactory) {
AutoProxyUtils.exposeTargetClass((ConfigurableListableBeanFactory) this.beanFactory, beanName, beanClass);
}
ProxyFactory proxyFactory = new ProxyFactory();
proxyFactory.copyFrom(this);
if (!proxyFactory.isProxyTargetClass()) {
if (shouldProxyTargetClass(beanClass, beanName)) {
proxyFactory.setProxyTargetClass(true);
} else {
evaluateProxyInterfaces(beanClass, proxyFactory);
}
}
Advisor[] advisors = buildAdvisors(beanName, specificInterceptors);
proxyFactory.addAdvisors(advisors);
proxyFactory.setTargetSource(targetSource);
customizeProxyFactory(proxyFactory);
proxyFactory.setFrozen(this.freezeProxy);
if (advisorsPreFiltered()) {
proxyFactory.setPreFiltered(true);
}
return proxyFactory.getProxy(getProxyClassLoader());
}
|
经过上面核心的两步,就可以获取代理对象了。
之后将分篇幅详细分析上面两步。


