引言
这篇文章的基础是:mybatis-XML配置官方中文文档,分析源码的前提也是先会使用,之后才是这个东西的实现原理,最终目标还是怎么更好的使用,或者开发其他工具的时候能够借鉴。
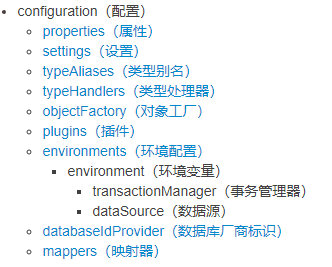
MyBatis配置文档的顶层结构如下:
1、mybatis-config.xml
我用于测试只简单配了一些:mybatis-config.xml。
1
2
3
4
5
6
7
8
9
10
11
12
| <?xml version="1.0" encoding="UTF-8"?>
<!DOCTYPE configuration
PUBLIC "-//mybatis.org//DTD Config 3.0//EN"
"http://mybatis.org/dtd/mybatis-3-config.dtd">
<configuration>
<settings>
<setting name="cacheEnabled" value="true"/>
</settings>
<typeAliases>
<typeAlias alias="People" type="com.demo.mybatis.entity.PeopleEntity"/>
</typeAliases>
</configuration>
|
具体配置还是要看官方文档。
2、spring-mybatis.xml
1
2
3
4
5
6
7
8
9
10
11
12
13
14
15
16
17
18
19
20
21
22
23
24
25
26
27
28
29
30
31
32
33
| <?xml version="1.0" encoding="UTF-8"?>
<beans xmlns="http://www.springframework.org/schema/beans"
xmlns:xsi="http://www.w3.org/2001/XMLSchema-instance"
xmlns:context="http://www.springframework.org/schema/context"
xsi:schemaLocation="http://www.springframework.org/schema/beans
http://www.springframework.org/schema/beans/spring-beans.xsd http://www.springframework.org/schema/context https://www.springframework.org/schema/context/spring-context.xsd">
<context:property-placeholder location="classpath:jdbc.properties"/>
<bean id="dataSource" class="com.zaxxer.hikari.HikariDataSource">
<property name="driverClassName" value="${jdbc.driver}"/>
<property name="jdbcUrl" value="${jdbc.url}"/>
<property name="username" value="${jdbc.username}"/>
<property name="password" value="${jdbc.password}"/>
</bean>
<bean id="sqlSessionFactory" class="org.mybatis.spring.SqlSessionFactoryBean">
<property name="configLocation" value="classpath:mybatis-config.xml"/>
<property name="dataSource" ref="dataSource"/>
<property name="mapperLocations" value="classpath:mapper/*.xml"/>
</bean>
<bean class="org.mybatis.spring.mapper.MapperScannerConfigurer">
<property name="basePackage" value="com.demo.mybatis.mapper"/>
</bean>
|
手动加载
1
2
3
4
5
6
7
8
9
| @EnableAutoConfiguration(exclude = {DataSourceAutoConfiguration.class})
public class AppApplicationTests {
@Test
public void test() {
ApplicationContext context = new ClassPathXmlApplicationContext("spring-mybatis.xml");
PeopleMapper peopleMapper = context.getBean(PeopleMapper.class);
System.out.println(JSONObject.toJSONString(peopleMapper.query()));
}
}
|
这里为什么要加上@EnableAutoConfiguration(exclude = {DataSourceAutoConfiguration.class})注解呢?因为springboot发现驱动的时候会自动的注入数据源,当没有在application.properties中配置数据源的时候,会发生错误,因为我是手动注册的数据源,所以需要关闭这个自动配置。
了解过spring源码的都会知道这个ClassPathXmlApplicationContext,它会解析xml,并将bean装载与IOC容器中,spring-mybatis.xml中涉及到dataSource,sqlSessionFactory,MapperScannerConfigurer三个bean,因为dataSource是需要注入到sqlSessionFactory中的,所以后面会分析sqlSessionFactory与MapperScannerConfigurer这两个bean的加载与初始化。